Imagine having a private, free, and powerful AI assistant that can search the web, write and debug code, and chat with you via Telegram—all running on your own hardware, with no API costs and zero data leaks. Sounds like a dream? It’s totally doable, and I’m going to walk you through exactly how I set it up.
In this guide, you’ll learn how to:
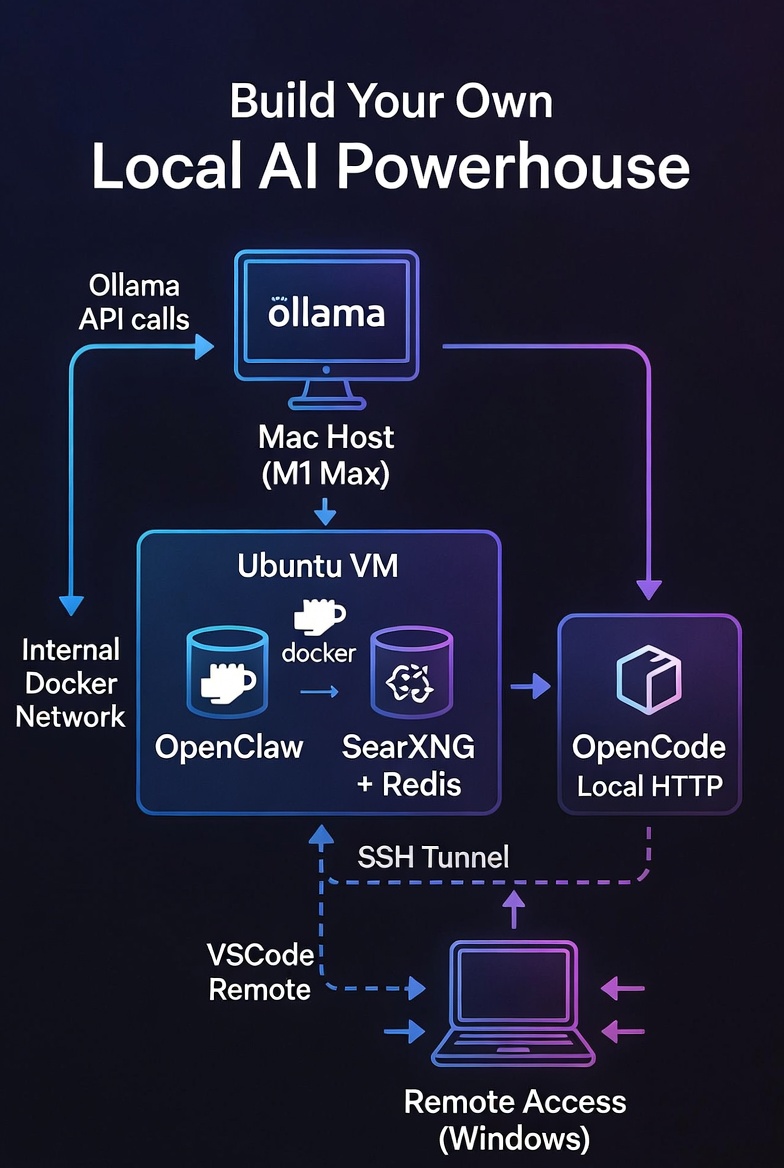
- Run an Ubuntu VM on a Mac (Apple Silicon) using VMware Fusion.
- Harden the VM and open only the necessary ports.
- Install Docker and run OpenClaw (a multi‑tool AI agent) and SearXNG (a privacy‑focused metasearch engine) in containers.
- Set up Ollama on the macOS host to serve local LLMs (like
gpt-oss:20b). - Install OpenCode, a dedicated coding agent, on the Ubuntu VM.
- Glue everything together so OpenClaw can delegate coding tasks to OpenCode and search the web via SearXNG.
- Securely access the whole setup from a Windows laptop via SSH tunneling and edit generated code with VSCode over SSH.
This isn’t a “theoretical” guide—I’ve tested every step, and by the end you’ll have a fully working system that you can actually use.
Prerequisites
- Hardware: A Mac with Apple Silicon (M1, M2, or M3) and at least 16 GB of RAM (32 GB recommended for smooth multitasking). The more RAM the better! A Windows laptop for remote access (optional but cool).
- Software: VMware Fusion (free for personal use) – download here. You’ll also need basic comfort with the terminal, SSH, and Docker.
- Network: Your Mac, Ubuntu VM, and Windows laptop should all be on the same local network (or you can use Tailscale for secure remote access later).
Step 1: Spin Up an Ubuntu VM with VMware Fusion
- Install VMware Fusion on your Mac and open it.
- Create a new VM: Choose “Install from disc or image” and select the Ubuntu Server LTS ISO (I used 24.04 LTS).
- Customise settings:
- Allocate at least 2 CPU cores and 4 GB of RAM (more if you have it).
- Set the network adapter to Bridged (so the VM gets its own IP on your LAN) or NAT with port forwarding if you prefer. Bridged is simpler for local access. And then make sure local IP for this bridge is static IP.
- Disk size: 50 GB should be plenty. But I went with 110 GB.
- Complete the installation – follow the Ubuntu prompts, create a user (e.g., adam), and install OpenSSH server when asked.
After reboot, note the VM’s IP address with ip a. I’ll use 192.168.2.42 as an example throughout this guide – replace it with your actual VM IP.
Step 2: Harden Ubuntu & Configure the Firewall
First, update everything and install ufw (Uncomplicated Firewall):
sudo apt update && sudo apt upgrade -ysudo apt install ufw -y
Now decide which ports need to be open:
- SSH – you’ll connect remotely, so keep this open. Better to change from port 22 to something non‑standard (e.g., 2222) for security.
- OpenClaw Web UI – default is
18789(we’ll forward it later). - OpenCode – runs on port
8081. - SearXNG – runs on port
8080. - (Optional) HTTP
80/ HTTPS443if you ever expose services directly. - DNS and NTP (outbound) are allowed by default.
Set a custom SSH port (optional but recommended). Edit /etc/ssh/sshd_config and change #Port 22 to Port 2222. Then restart SSH: sudo systemctl restart sshd. Now configure ufw:
sudo ufw default deny incomingsudo ufw default allow outgoingsudo ufw allow 2222/tcp # or 22 if you kept itsudo ufw allow 8080/tcp # SearXNGsudo ufw allow 8081/tcp # OpenCodesudo ufw allow 18789/tcp # OpenClaw Web UI (optional – we'll use SSH tunnel)sudo ufw enablesudo ufw status verbose
Now your VM is locked down but still accessible.
Step 3: Install Docker on Ubuntu
Follow the official Docker instructions for Ubuntu:
# Add Docker's official GPG key and repositorysudo apt install ca-certificates curlsudo install -m 0755 -d /etc/apt/keyringssudo curl -fsSL https://download.docker.com/linux/ubuntu/gpg -o /etc/apt/keyrings/docker.ascsudo chmod a+r /etc/apt/keyrings/docker.ascecho "deb [arch=$(dpkg --print-architecture) signed-by=/etc/apt/keyrings/docker.asc] https://download.docker.com/linux/ubuntu $(. /etc/os-release && echo "$VERSION_CODENAME") stable" | sudo tee /etc/apt/sources.list.d/docker.list > /dev/nullsudo apt updatesudo apt install docker-ce docker-ce-cli containerd.io docker-buildx-plugin docker-compose-plugin -y# Add your user to the docker group to run docker without sudosudo usermod -aG docker $USERnewgrp docker
Verify with docker run hello-world.
Step 4: Install Ollama on the Mac Host
Now we work more with Mac (the host machine). We’ll install Ollama and pull a model that OpenClaw and OpenCode can use.
- Download Ollama from ollama.ai and install it.
- Pull a model. I chose
gpt-oss:20bbecause it’s a good balance of quality and resource usage: ollama pull gpt-oss:20b (You can also usellama3,codellama, or any other model you like. But my experience with gpt-oss:20b is best with Mac M1 32GB RAM that has to do double duty such as running VM and LLM at the same time.) - Expose Ollama to your local network. By default Ollama listens only on
127.0.0.1. To let your Ubuntu VM reach it, you need to bind to0.0.0.0.- Easiest way to do – Via GUI (install Ollama desktop on Mac): Some versions have a setting in the menu bar icon – look for “Allow network access” or similar.
192.168.2.32) and test from the Ubuntu VM: curl http://192.168.2.32:11434/v1/models you should see a list of models (includinggpt-oss:20b).
Step 5: Install OpenClaw Using the Official Docker Setup Script
The proper way to install OpenClaw isn’t with a simple docker run command, but by using the project’s dedicated setup script. This script handles several critical tasks: it clones the repository (if needed), builds the Docker image locally, runs an interactive onboarding wizard to configure your AI provider and channels, creates the necessary directory structure, and starts the gateway using Docker Compose .
5.1 Clone the Repository and Prepare Directories
First, let’s create a dedicated directory for OpenClaw and clone the official repository:
mkdir -p ~/openclawcd ~/openclawgit clone https://github.com/openclaw/openclaw.gitcd openclaw
The setup script expects two directories for persistent data: one for configuration and one for the agent’s workspace. We’ll create these now and set proper permissions :
mkdir -p ~/openclaw-data/config ~/openclaw-data/workspacechmod 700 ~/openclaw-data/config ~/openclaw-data/workspace
5.2 (Optional but Recommended) Customise the Dockerfile
To ensure OpenClaw can communicate with SearXNG and run any Python‑based tools without issues, we’ll add Python, pip, and a few useful packages (like httpx and rich) to the Docker image. This step is optional but solves potential “missing dependency” errors later.
Why? Some OpenClaw skills (including the SearXNG skill) or helper scripts may rely on Python or specific libraries. By adding them now, you avoid having to patch the container later.
Open the Dockerfile in the cloned repository:
nano Dockerfile
Look for the line that switches to the node user. It usually appears near the end of the file, looking something like:
USER node
Insert the following block before a block contains USER node line. Make sure not to break the original block with its own USER node line OK? The USER node line is to properly demote root user back to node user within docker container for security purpose.
#################### Custom packages starting here #############USER root# Install Python and pipRUN apt-get update && apt-get install -y python3 python3-pip nano vim coreutils && \ apt-get clean && rm -rf /var/lib/apt/lists/*# Install Python packagesRUN pip3 install httpx rich --break-system-packages # or use --user if preferred##################### Custom package ending here ################
After inserting, the relevant part of the Dockerfile will look like:
... (previous content) ...

#################### Custom packages starting here #############
USER root
RUN apt-get update && apt-get install -y python3 python3-pip nano vim coreutils && \
    apt-get clean && rm -rf /var/lib/apt/lists/*
RUN pip3 install httpx rich --break-system-packages
##################### Custom package ending here ################
Next immediate block of stuff with the User node line below
USER node
... (remaining content) ...
Save the file (Ctrl+O, then Ctrl+X in nano). Now the image built from this Dockerfile will include Python, pip, and the extra packages.
5.3 Create an Environment File
Before running the setup, create a .env file in the ~/openclaw/openclaw directory. This file tells Docker Compose where to store your persistent data :
cat > .env << EOFOPENCLAW_CONFIG_DIR=~/openclaw-data/configOPENCLAW_WORKSPACE_DIR=~/openclaw-data/workspaceOPENCLAW_GATEWAY_PORT=18789OPENCLAW_GATEWAY_BIND=loopbackEOF
The OPENCLAW_GATEWAY_BIND=loopback setting ensures the gateway only listens on localhost (127.0.0.1), which is a security best practice—you’ll access it via an SSH tunnel later .
5.3 Run the Setup Script
Now execute the Docker setup script. This will build the OpenClaw image locally (which may take a few minutes the first time) and launch an interactive onboarding wizard :
./docker-setup.sh
The script will:
- Build the Docker image using the provided Dockerfile
- Start the onboarding wizard inside a temporary container
- Guide you through configuration
5.4 Complete the Onboarding Wizard
The wizard will ask you several questions. Here’s how to answer them for our setup :
| Prompt | Recommended Answer | Notes |
|---|---|---|
| Security acknowledgment | Yes | Read the warning first |
| Onboarding mode | Manual or follow interactive prompts | Gives you full control |
| Config handling | Update values | Create a new configuration |
| What to set up | Local gateway (this machine) | We’re running locally |
| Workspace directory | /home/node/.openclaw/workspace | Accept default (maps to our volume) |
| Model/auth provider | Choose Other or Custom | Since we’re using Ollama, not a cloud provider |
| Auth method | Select appropriate option | We’ll configure Ollama separately |
| Default model | Skip or choose placeholder | We’ll edit config manually later |
Important: Since we’re using a local Ollama model rather than a cloud provider (Anthropic/OpenAI), the wizard won’t automatically configure it. That’s fine—we’ll manually add the Ollama provider to the config file in the next step. If the wizard asks for an API key, you can provide a dummy value for now like ollama.
After completing the wizard, it will generate a gateway token and start the OpenClaw gateway service via Docker Compose .
5.5 Verify the Installation
Check that everything is running correctly:
cd ~/openclaw/openclawdocker compose ps
You should see the openclaw-gateway container with status “Up” . View the logs to confirm there are no errors, make sure the openclaw-gateway is the actual container name:
docker compose logs openclaw-gateway
Look for a line like [gateway] listening on ws://0.0.0.0:18789 .
5.6 Locate Your Gateway Token
You’ll need the gateway token to access the Control UI later. Find it with :
grep -A1 '"token"' ~/openclaw-data/config/openclaw.json
Or check the output from the setup script—it usually displays the token at the end. Save this token somewhere secure.
5.7 Understanding the Directory Structure
Your OpenClaw data is now organized as follows :
| Path | Purpose |
|---|---|
~/openclaw/openclaw/ | Repository and Docker Compose files |
~/openclaw-data/config/ | Configuration and credentials (openclaw.json, sessions) |
~/openclaw-data/workspace/ | Agent workspace (where code projects will live) |
5.8 Managing OpenClaw Going Forward
Use these commands from the ~/openclaw/openclaw directory :
# Stop the servicedocker compose down# Start the servicedocker compose up -d# View logsdocker compose logs -f openclaw-gateway# Run CLI commands (like adding channels)docker compose exec openclaw-gateway openclaw channels list
Why This Approach Is Better
The official setup script method offers several advantages over a simple docker run :
- Proper onboarding – Configures AI providers, channels, and security settings interactively
- Correct volume mounts – Ensures persistent data survives container updates
- Image built locally – You run exactly the version in the repository
- Docker Compose integration – Easier management, updates, and troubleshooting
- Security defaults – Gateway binds to loopback by default, preventing external access
Now that OpenClaw is properly installed with the correct method, you can proceed to configure it to use your Ollama model (as described in Step 6 of the original article) and set up SearXNG integration. The configuration file at ~/openclaw-data/config/openclaw.json is where you’ll add the Ollama provider details, exactly as shown in your sample configuration.
Step 6: Configure OpenClaw to Use Ollama
Now we need to tell OpenClaw about your Ollama instance. You can do this either via the Web UI (once we access it) or by editing the configuration file directly.
Let’s do it the manual way (which also helps you understand the structure). Stop the container temporarily:
docker stop openclaw
Edit ~/openclaw-data/openclaw.json or ~/.openclaw/openclaw.json depending on how you actually setup your openclaw earlier (this file is created after the first run). Look for the "models" section and add a provider for Ollama. Based on my setup, here’s what you need to add (adjust the IP to your Mac’s IP):
"models": { "mode": "merge", "providers": { "ollama-mac": { "baseUrl": "http://192.168.2.32:11434/v1", "apiKey": "ollama", "api": "openai-completions", "models": [ { "id": "gpt-oss:20b", "name": "gpt-oss:20b (via Mac)", "api": "openai-completions", "reasoning": true, "input": ["text"], "cost": { "input": 0, "output": 0, "cacheRead": 0, "cacheWrite": 0 }, "contextWindow": 132000, "maxTokens": 32000 } ] } }}
Then, under "agents" -> "defaults" -> "model", set the primary model to the one you just added:
"agents": { "defaults": { "model": { "primary": "ollama-mac/gpt-oss:20b" }, ... }}
Save the file and restart the container:
docker compose restart openclaw-gateway
Your OpenClaw instance is now ready to use the local LLM.
Step 7: Set Up SearXNG + Redis Using Docker Compose (Connected to OpenClaw’s Network)
We’ll create a dedicated Compose file for SearXNG and Redis, and connect both to the existing Docker network that OpenClaw is using. This allows OpenClaw to reach SearXNG by its service name (searxng), and SearXNG to use Redis internally.
7.1 Prepare a Directory for SearXNG + Redis
Create a folder to hold the Compose file and persistent data:
mkdir -p ~/searxngcd ~/searxng
7.2 Create a Docker Compose File with Redis
Create a file named docker-compose.yml in ~/searxng with the following content:
services: redis: image: redis:alpine container_name: searxng-redis restart: unless-stopped command: redis-server --save 60 1 --loglevel warning volumes: - ./redis-data:/data networks: - openclaw_network searxng: image: searxng/searxng:latest container_name: searxng restart: unless-stopped ports: - "8080:8080" volumes: - ./searxng-data:/etc/searxng:rw environment: - SEARXNG_BASE_URL=http://localhost:8080/ - SEARXNG_REDIS_URL=redis://redis:6379/0 depends_on: - redis networks: - openclaw_networknetworks: openclaw_network: external: true name: openclaw_default # <-- replace with your actual OpenClaw network name
Explanation:
- Redis service: Uses the lightweight
redis:alpineimage, persists data to./redis-data, and is configured to save periodically. It joins the same network. - SearXNG service: Now includes the environment variable
SEARXNG_REDIS_URLpointing to the Redis container (redis://redis:6379/0). This tells SearXNG to use Redis for caching and rate limiting. - Volumes:
./searxng-datawill hold SearXNG’ssettings.ymland other config files../redis-dataholds Redis persistence. - Network: Both services attach to the external network
openclaw_network, which we define to match OpenClaw’s actual network.
7.3 Identify OpenClaw’s Docker Network
Find the exact name of the network that OpenClaw’s gateway container is using:
docker network ls
Look for a network name containing openclaw (e.g., openclaw_default). Confirm by inspecting the container:
docker inspect openclaw-gateway | grep -A 10 "Networks"
Take note of the network name, and replace openclaw_default in the name: field of the Compose file with your actual network name.
7.4 Prepare Directories and Initial Configuration
Create the required directories:
mkdir -p ~/searxng/searxng-data ~/searxng/redis-data
SearXNG may need an initial settings.yml file. You can let it generate a default one by starting the container once, then modifying it. But to be proactive, create a minimal settings.yml:
cat > ~/searxng/searxng-data/settings.yml << 'EOF'# SearXNG settingsuse_default_settings: trueserver: port: 8080 bind_address: "0.0.0.0" secret_key: "change-this-secret-key" # CHANGE THIS! limiter: true public_instance: falseredis: url: redis://redis:6379/0search: safe_search: 0 autocomplete: "google"EOF
Important: Change secret_key to a long random string. You can generate one with openssl rand -hex 32.
7.5 Start the Services
Now launch SearXNG and Redis together:
cd ~/searxngdocker compose up -d
Check that both containers are running:
docker compose ps
You should see searxng and searxng-redis both with status “Up”.
7.6 Test SearXNG
Test access from the host:
curl http://localhost:8080
You should get an HTML response (the SearXNG start page). Also open a browser on your Mac (or any machine on the same LAN) and go to http://192.168.2.42:8080 (replace with your VM’s IP). You should see the SearXNG search interface.
7.7 Verify Connectivity from OpenClaw Container
Confirm that OpenClaw can reach SearXNG:
docker exec -it openclaw-gateway curl http://searxng:8080
If you get the HTML response, everything is working.
7.8 Configure OpenClaw to Use SearXNG
Now edit OpenClaw’s configuration file (~/openclaw-data/config/openclaw.json) to add the SearXNG URL:
"env": { "SEARXNG_URL": "http://searxng:8080"}
Also enable the SearXNG skill:
"skills": { "entries": { "searxng": { "enabled": true }, // ... other skills }}
Save the file and restart OpenClaw:
cd ~/openclaw/openclawdocker compose restart openclaw-gateway
7.9 Managing SearXNG and Redis
From the ~/searxng directory, you can use standard Docker Compose commands:
# Stop both servicesdocker compose down# Start them againdocker compose up -d# View logs (both services)docker compose logs -f# Update imagesdocker compose pulldocker compose up -d
Why This Setup Is Robust
- Redis integration ensures SearXNG performs well even with many requests.
- Separate containers allow independent updates and clear separation of concerns.
- External network ties everything together without manual
docker network connectsteps. - Persistent volumes keep your configuration and Redis data safe.
Now you have a production‑grade SearXNG instance with Redis, fully integrated with OpenClaw. Proceed to Step 8 to continue integrating it with OpenClaw’s skills.
Step 8: Install and Configure OpenCode (Self‑Hosted on Your Ubuntu VM)
OpenCode is a terminal‑native coding agent that can run as a persistent service. In our architecture, OpenCode runs on the same Ubuntu VM that hosts OpenClaw and SearXNG. It uses your local Ollama models (running on your Mac) via its OpenAI‑compatible adapter. This keeps everything on your hardware, provides low‑latency communication between OpenClaw and OpenCode, and allows you to generate, edit, and debug code without ever touching the cloud.
8.1 Install OpenCode
SSH into your Ubuntu VM (or use the terminal directly). The official OpenCode installation script places the binary in ~/.opencode/bin and updates your shell configuration.
curl -fsSL https://opencode.ai/install | bash
After the script completes, either restart your shell or run:
source ~/.bashrc
Verify the installation:
opencode --version
If the script fails or you prefer a manual install, you can download the latest binary from the OpenCode official releases page.
8.2 Configure OpenCode to Use Your Local Ollama Model
Your Ollama instance runs on your Mac at IP 192.168.2.32 (adjust if your Mac has a different local IP). OpenCode needs to know how to reach it and which model to use by default.
Create the configuration directory and file:
mkdir -p ~/.config/opencodenano ~/.config/opencode/opencode.json
Paste the following configuration (replace the IP address with your Mac’s actual IP):
{ "$schema": "https://opencode.ai/config.json", "provider": { "ollama-mac": { "type": "openai-compatible", "name": "Ollama on Mac", "baseURL": "http://192.168.2.32:11434/v1", "apiKey": "ollama" } }, "model": "ollama-mac/gpt-oss:20b", "small_model": "ollama-mac/gpt-oss:20b"}
type: "openai-compatible"tells OpenCode to use the OpenAI‑compatible adapter, which works perfectly with Ollama’s/v1endpoints.apiKeyis required by the adapter but can be any placeholder – Ollama ignores it.
8.3 Create a Persistent OpenCode Session (Recommended)
OpenCode uses sessions to maintain conversation context. You can create a session once and reuse it for all tasks, avoiding the overhead of creating a new session every time. This session will be used by the wrapper script.
First, encode your password (the one you’ll set in the service) in base64. We’ll use 123passwd as an example – choose a strong password and remember it.
AUTH=$(echo -n "opencode:123passwd" | base64)
Now create a session:
curl -X POST http://localhost:8081/session \ -H "Authorization: Basic $AUTH" \ -H "Content-Type: application/json" \ -d '{"title": "OpenClaw persistent session"}'
The response will include a sessionId (e.g., ses_abc123...). Copy this ID – you’ll need it in the wrapper script.
8.4 Run OpenCode as a Systemd Service
To ensure OpenCode starts automatically on boot and runs in the background, create a systemd service.
Create the service file:
sudo nano /etc/systemd/system/opencode.service
Paste the following, adjusting User and paths to match your setup (replace adam with your username):
[Unit]Description=OpenCode ServerAfter=network.target[Service]Type=simpleUser=adamWorkingDirectory=/home/adamExecStart=/home/adam/.opencode/bin/opencode serve --hostname 0.0.0.0 --port 8081Restart=on-failureEnvironment="PATH=/usr/local/bin:/usr/bin:/bin:/home/adam/.opencode/bin"Environment="OPENCODE_SERVER_PASSWORD=123passwd" # use the password you chose[Install]WantedBy=multi-user.target
--hostname 0.0.0.0makes the server listen on all interfaces (so OpenClaw can reach it).--port 8081matches the port we’ll use in the wrapper.- The environment variable
OPENCODE_SERVER_PASSWORDsets the password required for API calls.
Enable and start the service:
sudo systemctl daemon-reloadsudo systemctl enable opencode.servicesudo systemctl start opencode.servicesudo systemctl status opencode.service
Check that OpenCode is listening on port 8081:
curl -u "opencode:123passwd" http://192.168.2.42:8081/health
You should see a JSON response indicating the server is healthy.
8.5 Create the OpenClaw Wrapper Script
OpenClaw will delegate coding tasks to OpenCode by executing a small Node.js script that calls OpenCode’s API. Place this script inside the OpenClaw container (or in a mounted volume that persists). The script uses fetch, which is available in the container’s Node.js environment.
First, enter the OpenClaw container:
docker exec -it openclaw-gateway /bin/bash
Create the wrapper script at /home/node/.openclaw/workspace/opencode-wrapper.js:
nano /home/node/.openclaw/workspace/opencode-wrapper.js
Paste the following content, replacing the placeholders:
- Replace
123passwdwith your actual OpenCode password. - Replace
ses_abc123...with the session ID you created. - The IP
192.168.2.42should be your Ubuntu VM’s IP.
#!/usr/bin/env nodeconst task = process.argv[2];if (!task) { console.error('Usage: opencode-wrapper.js "task description"'); process.exit(1);}const AUTH = 'opencode:123passwd'; // your passwordconst SESSION_ID = 'ses_abc123...'; // your session IDconst URL = `http://192.168.2.42:8081/session/${SESSION_ID}/message`;const headers = { 'Authorization': 'Basic ' + Buffer.from(AUTH).toString('base64'), 'Content-Type': 'application/json'};const body = { parts: [{ type: 'text', text: task }], model: { providerID: 'ollama-mac', modelID: 'gpt-oss:20b' }, agent: 'build'};fetch(URL, { method: 'POST', headers, body: JSON.stringify(body) }) .then(res => res.json()) .then(data => { // Extract the final answer (the last text part) const textParts = data.parts?.filter(p => p.type === 'text') || []; const answer = textParts.length > 0 ? textParts[textParts.length - 1].text : JSON.stringify(data); console.log(answer); }) .catch(err => console.error('Error:', err.message));
Make the script executable:
chmod +x /home/node/.openclaw/workspace/opencode-wrapper.js
Test it manually (from inside the container):
node /home/node/.openclaw/workspace/opencode-wrapper.js "Say hello"
You should see a response like "Hello!". If you get a connection error, verify that the IP and port are correct and that the OpenCode service is running.
Exit the container (exit).
8.6 Instruct OpenClaw’s Agent to Use the Wrapper
OpenClaw reads behavioral instructions from a file named AGENTS.md located in its workspace. We need to add a section that tells the main agent to delegate all coding tasks to OpenCode via the wrapper.
Enter the container again (or edit the file directly if the workspace is mounted from the host). For simplicity, we’ll edit inside the container:
docker exec -it openclaw-gateway /bin/bash
Edit (or create) the file /home/node/.openclaw/workspace/AGENTS.md:
nano /home/node/.openclaw/workspace/AGENTS.md
Append the following content:
## 🧑💻 Coding Tasks (Delegation to OpenCode)When the user asks you to **write, edit, debug, refactor, or understand code**, you **MUST** delegate the task to OpenCode, a specialized coding agent running on the VM.Use the `exec` tool with the following command:```bashnode /home/node/.openclaw/workspace/opencode-wrapper.js "the user's coding task description"Important:- Always capture the output of the command and present it directly to the user.- Do not attempt to simulate code generation yourself; rely on OpenCode.- The script handles authentication and communication with OpenCode.- If the task involves a specific file or directory, include that context in the description.
Save the file and exit the container.
8.7 Ensure OpenClaw Allows `exec` on the Gateway
Your OpenClaw configuration must permit the exec tool to run commands on the gateway (the main process). Edit ~/openclaw-data/config/openclaw.json (on the host) and verify the following settings:
```json"tools": { "profile": "full", "allow": ["*"], "exec": { "host": "gateway" }}
If you previously enabled sandbox mode for the agent, disable it:
"agents": { "defaults": { "sandbox": { "mode": "off" } }}
After making changes, restart OpenClaw:
cd ~/openclaw/openclawdocker compose restart openclaw-gateway
8.8 Test the Integration
Now it’s time to see if everything works together.
- Set up an SSH tunnel from your Windows laptop (or any machine) to access the OpenClaw Web UI: ssh -N -L 18789:127.0.0.1:18789 -p 22 adam@192.168.2.42(Replace adam with your VM username and 22 with your SSH port if you changed it.)
- Open a browser on your local machine and go to
http://localhost:18789. Log in with the gateway token you saved earlier. (OpenClaw token you created with onboard during first installation using docker-setup.sh script.) - Send a coding request to OpenClaw, for example: “Create a simple ‘Hello World’ Flask app. First create a folder called
projectsif it doesn’t exist, then inside it create a folder calledflask-hello, and place theapp.pyfile inside that folder. After writing the code, show me the content.” - OpenClaw should delegate the task to OpenCode via the wrapper. After a few seconds, you’ll see the generated code in the chat response.
- Verify the files were created on the host:
ls -la ~/openclaw-data/workspace/projects/flask-hello/You should seeapp.py. You can also enter the OpenClaw container and run the app to test it:docker exec -it openclaw-gatewayand then docd /home/node/.openclaw/workspace/projects/flask-helloand then dopython3 -m venv venvand then dosource venv/bin/activateand then dopip install flask python app.pyand then, from another terminal, create another SSH tunnel to forward the Flask app’s port (5000) to your local machine:ssh -N -L 5000:localhost:5000 -p 22 adam@192.168.2.42. Visithttp://localhost:5000in your browser – you should see “Hello World!”.
8.9 What’s Next?
You now have a fully integrated local AI coding assistant. In the next step, we’ll set up remote access from Windows using VSCode’s Remote – SSH extension, allowing you to browse and edit the generated code directly from your laptop. Optionally, we’ll also add a Telegram bot for on‑the‑go interactions.
Note on Security: The OpenCode server uses Basic Authentication with a password. Ensure your OPENCODE_SERVER_PASSWORD is strong and not shared. The service listens on all interfaces, but since your VM is behind a firewall and only accessible via SSH, this is acceptable for a home lab. For production, consider adding TLS or using a reverse proxy.
Step 13: Access and Edit Code from Windows with VSCode
One of the coolest parts is being able to browse and edit the generated code directly from your Windows laptop using VSCode’s Remote – SSH extension.
- Install Visual Studio Code on Windows.
- Install the Remote – SSH extension.
- Press
F1and run “Remote-SSH: Connect to Host…”. - Enter
ssh adam@192.168.2.42 -p 22(adjust username, IP, port). - Once connected, open the folder
/home/adam/openclaw-data/workspace(or wherever your OpenClaw data volume is mounted – mine is /home/adam/.openclaw/workspace).
Now you can view, edit, and manage all the projects that OpenClaw/OpenCode creates, right from VSCode on Windows. You can even open a terminal in VSCode that runs on the Ubuntu VM.
Step 14: (Optional) Add a Telegram Bot for On‑the‑Go Access
OpenClaw can also be accessed via Telegram. This is great for quick queries or starting tasks while away from your computer.
- Create a bot with @BotFather on Telegram. Get the token.
- Edit
openclaw.jsonand add atelegramsection underchannels:json"channels": { "telegram": { "enabled": true, "dmPolicy": "pairing", "botToken": "your-bot-token-here", "groupPolicy": "allowlist", "streaming": "partial" } } - Restart OpenClaw:
docker restart openclaw. - Start a chat with your bot on Telegram and send
/start. Follow the pairing instructions (you may need to send a code from the OpenClaw UI to the bot).
Now you can talk to your AI from anywhere (usually on Android mobile Telegram app or other smartphone platform that supports Telegram mobile app)!
Conclusion
You’ve just built a powerful, self‑hosted AI ecosystem that includes:
- A local LLM served by Ollama.
- A multi‑tool agent (OpenClaw) that can search the web via SearXNG.
- A dedicated coding agent (OpenCode) for all programming tasks.
- Remote access from Windows with VSCode integration.
- Optional Telegram interface.
All of this runs on your own hardware, respects your privacy, and costs nothing beyond electricity. The possibilities are endless – you can extend it with more skills, add more models, or even integrate it with home automation.
If you run into any issues, remember that most of the components have active communities and documentation. And because everything is local, you can experiment freely without worrying about burning through API credits. Still having issues? You can always communicate with a cloud AI service like Chat GPT, etc… to get the solutions, OK?
Happy building!
Disclaimer
Important: Please Read Carefully Before Proceeding
Experimental Nature of This Setup
The system described in this article—combining OpenClaw, OpenCode, SearXNG with Redis, Ollama on macOS, and remote access via SSH—is a complex, experimental integration of multiple open‑source projects. While every effort has been made to ensure the instructions are accurate and functional, this setup is not an official, production‑grade deployment of any single component.
Assumptions and Prerequisites
This guide assumes you have:
- A Mac with Apple Silicon (M1/M2/M3) running VMware Fusion.
- Intermediate to advanced comfort with the command line, SSH, Docker, and basic networking.
- A local network where you can assign static IP addresses or know how to discover dynamic ones.
- Sufficient RAM and CPU resources to run an Ubuntu VM, multiple Docker containers, and a local LLM simultaneously (32 GB RAM recommended).
Your actual hardware, network configuration, and software versions may differ. You are responsible for adapting the instructions to your environment.
Network and IP Addresses
Throughout this guide, we use example IP addresses:
192.168.2.32for the Mac (host)192.168.2.42for the Ubuntu VM
You must replace these with the actual IP addresses on your own network. Failure to do so will result in connection failures. If your local network uses a different subnet (e.g., 192.168.1.x or 10.0.0.x), adjust all IP references accordingly.
Security Considerations
This setup opens several services on your local network:
- OpenCode listens on port
8081with Basic Authentication (password‑protected). - SearXNG listens on port
8080. - OpenClaw is bound to
localhostbut accessed via SSH tunnel. - SSH is exposed (possibly on a non‑standard port) for remote access.
You are responsible for:
- Choosing strong passwords and tokens.
- Keeping your Ubuntu VM and all containers updated.
- Configuring your firewall (
ufw) appropriately. - Understanding that exposing services to your LAN may have security implications if your network is shared or untrusted.
The instructions include basic hardening steps (e.g., changing the SSH port, enabling ufw, binding OpenClaw to loopback). These are minimum recommendations and may not be sufficient for all threat models.
Software Versions and Updates
Open source projects evolve rapidly. By the time you read this, the software versions may have changed:
- OpenClaw (the setup script, Dockerfile, and configuration format)
- OpenCode (installation method, configuration schema, API endpoints)
- SearXNG (environment variables, Redis integration)
- Ollama (API compatibility, model naming)
- Ubuntu (LTS releases, package versions)
If a command or configuration file no longer works, consult the official documentation for each project. The core principles should remain valid, but implementation details may shift.
No Warranty and Limitation of Liability
This guide is provided “AS IS”, without warranty of any kind, express or implied, including but not limited to the warranties of merchantability, fitness for a particular purpose, and noninfringement. In no event shall the author or contributors be liable for any claim, damages, or other liability, whether in an action of contract, tort or otherwise, arising from, out of, or in connection with the article or the use of the system described.
Backup Your Data
Before making significant changes to your system—such as modifying Dockerfiles, running setup scripts, or changing network configurations—back up your important data. The instructions involve creating directories and configuration files that could inadvertently overwrite existing content if paths are mistyped.
Third‑Party Links and References
This article may refer to external websites, GitHub repositories, or YouTube videos. These links are provided for convenience only; the author does not endorse, control, or guarantee the accuracy of content on external sites.
Your Responsibility
By following this guide, you acknowledge that:
- You understand the risks involved in setting up self‑hosted services.
- You have read and understood this disclaimer.
- You accept full responsibility for any consequences arising from your use of these instructions, including but not limited to data loss, security breaches, or system instability.
If you do not agree with these terms, do not proceed with the installation.
This disclaimer was last updated on March 10, 2026.

Leave a comment